Table of Contents
- Why Can’t I Just Print a Phone Photo?
- Best Tools to Upscale Images for Print in 2025 – and why it matters
- How to Upscale Images for Print: A Step-by-Step Workflow
- Why Upscale Images for Print Services Pay Off – and why it matters
- Mistakes to Avoid When You Upscale Images for Print
- How to Get Started with Print Optimization
- Listen to This Article
All right, let’s get into it. So you got a client who wants a massive 24×36 print for their office wall. Imagine Selling as the engine. Everything else is bodywork. They’re excited, they’ve got the budget and then they send you the file. It’s a 2MB JPEG they took on an iPhone three years ago, which means you open it up, zoom in to 100%, and it looks like a Minecraft screenshot that desperately needs you to upscale images for print.
We’ve all been there.
Riley Santos, a creative storyteller I know, ran into this exact problem last week. A client wanted a billboard-style print from a social media post. Riley was sweating bullets thinking he’d have to tell the client, “No can do.” But here’s the thing—in 2025, saying “no” to low-res files is leaving money on the table when you can upscale images for print.
Today we’re gonna go over how to fix this. This is the oil change of tool — boring but necessary. We’re going to look at how to upscale images for print so they look crisp, professional, and actually worth the higher-tier prices you wanna charge. Honestly, with the tools we have now, taking a phone photo to gallery quality isn’t magic; it’s just knowing which buttons to push.
Why Can’t I Just Print a Phone Photo?
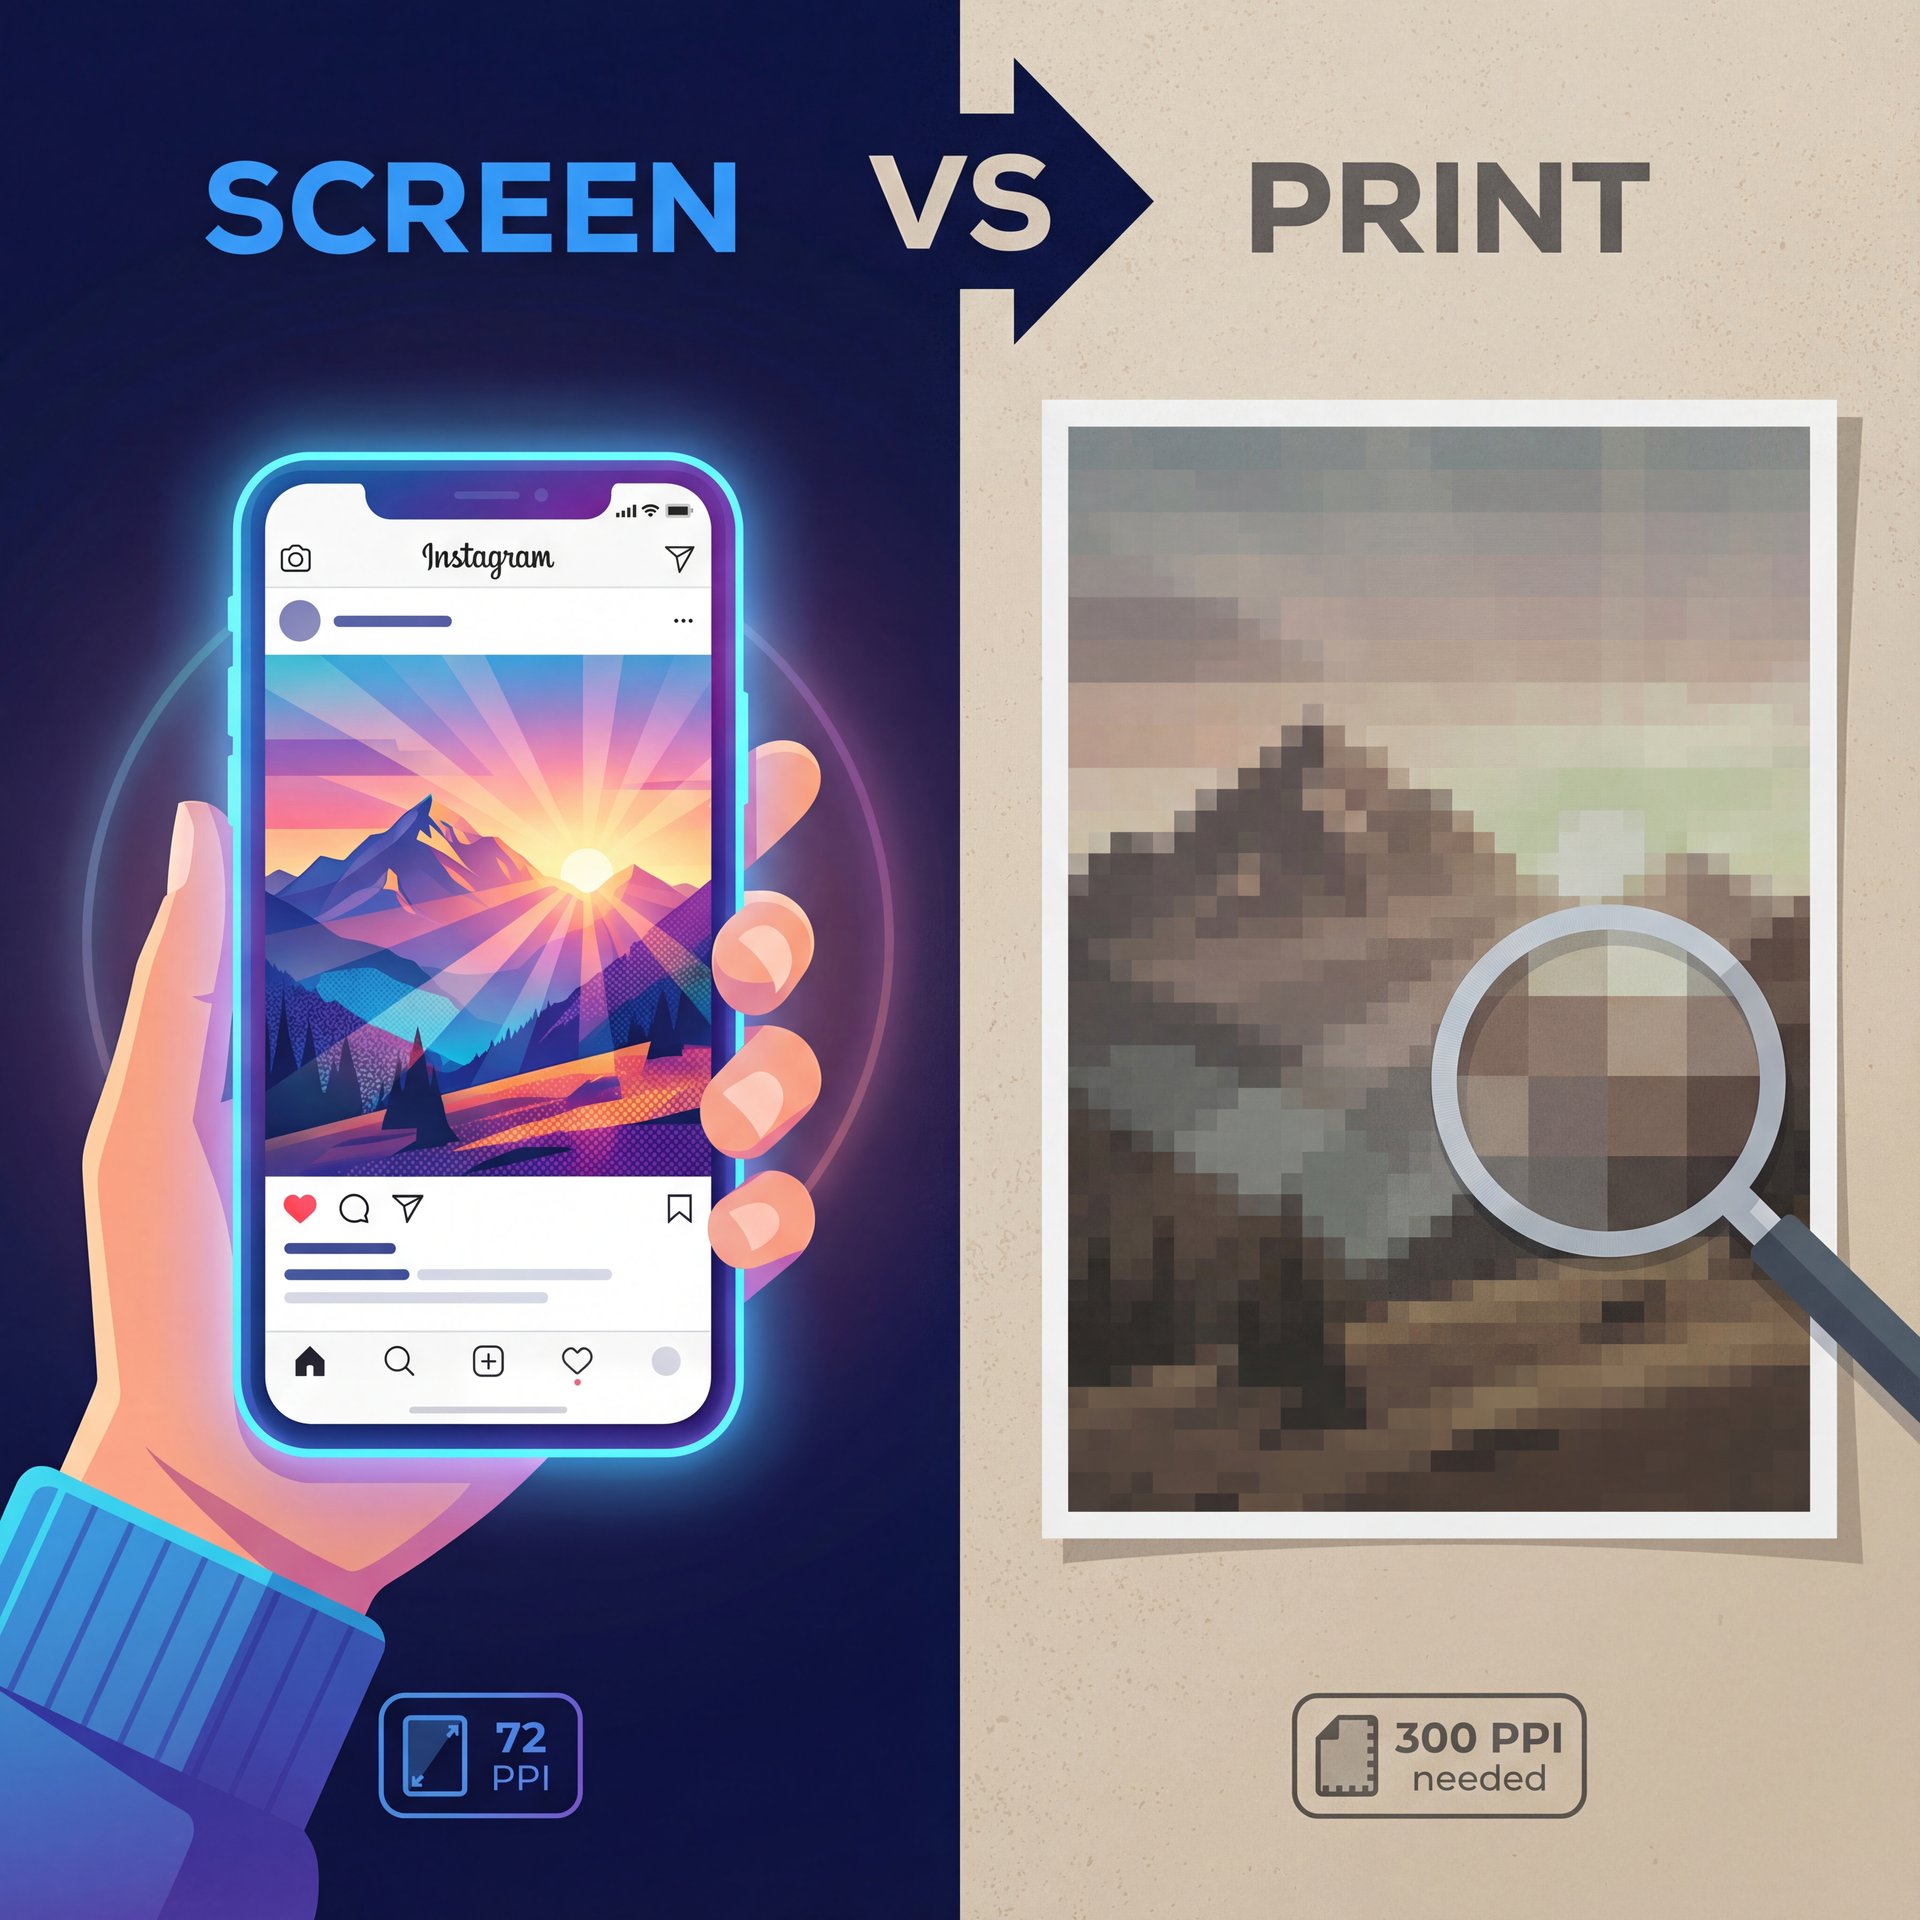
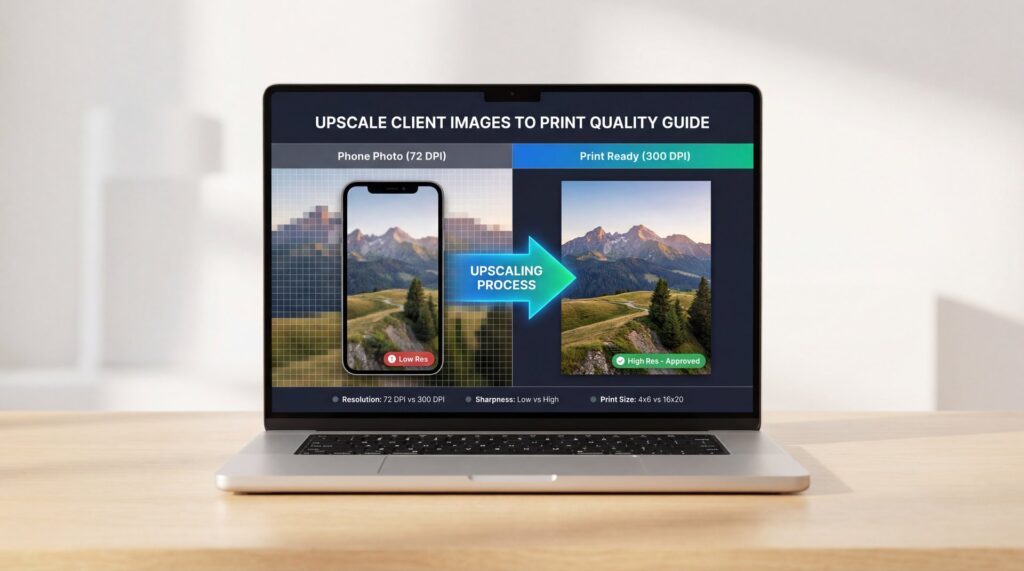
So, let’s go under the hood for a second. Why does that photo look great on Instagram but terrible on a poster when you need to upscale images for print? It comes down to pixel density. Period. Screens are forgiving—they light up, they’re bright, and most people are looking at them on a phone where the pixels are packed tight.
But print? Print is unforgiving. It doesn’t emit light; it reflects it. Selling is basically the steering wheel of this whole operation. If you don’t have enough data points (pixels) per inch when you upscale images for print, the printer has to guess what goes in the gaps. Usually, it guesses wrong, leaving you with a blurry, blocky mess.
Here’s what you need to know when you upscale images for print. A standard screen displays at 72 PPI (pixels per inch). A high-quality print needs 300 DPI (dots per inch). That means you need roughly four times the data for print as you do for screen.
(Speaking of which…)
If you send a low-res file to the lab, you’re rolling the dice. In fact, 22% of returns in the photo-gift space happen because the image wasn’t what the customer expected. You don’t want to be the one explaining why their expensive canvas looks like pixel soup.
The good news is that consumer expectations are actually helping us here. With 4K screens making up 71% of commercial purchases in 2025, people are used to seeing sharp images. They want that same sharpness on their walls. And that’s where you come in with the right upscale workflow.
Best Tools to Upscale Images for Print in 2025 – and why it matters
Now, I’m not going to tell you to just “use AI.” That’s too vague. We need specific tools for specific jobs. I’ve tested a bunch of these and here’s what I’ve found works best when you need to upscale images for print without making them look fake.
First up, you’ve got Topaz Gigapixel. This has been the industry standard for a minute and for good reason. It’s honestly impressive at keeping the original “feel” of the photo while adding the necessary resolution. It doesn’t hallucinate new details as much as some others; it just sharpens what’s there.
Then there’s Magnific AI. This one is a beast. It’s a “generative” upscaler, which means if you have a blurry texture on a sweater, Magnific will actually invent realistic wool texture to fill it in. It’s incredible for creative shots, but you have to be careful with faces. You don’t want your client looking like a different person.
Topaz Gigapixel
Best for fidelity
- ✓ Keeps original likeness perfectly
Magnific AI
Best for texture
- ✓ Invents detail where none exists
Adobe Super Res
Best for raw files
- ✓ Integrated right into Photoshop
I use a mix of both. If I have a really low-res file, I might run it through Magnific to get the texture back, then blend it with the original in Photoshop so the face doesn’t look weird. Key insight.
Also, don’t sleep on the basics. Sometimes you just need a clean enlargement for a quick flyer or social post. For that, check out some of the AI editing features we use for quick turnarounds. It’s not always about 8K gallery prints; sometimes speed wins.
Pro Tip: Always upscale on a duplicate layer or a seperate file. You never want to save over your client’s original. If the AI goes haywire and gives them three eyes, you need to be able to go back to square one.
How to Upscale Images for Print: A Step-by-Step Workflow
All right, so let’s get our hands dirty. You’ve got the file, you’ve got the software. How do you actually do this without messing it up?
Here is the workflow I use when I’m charging for this service.
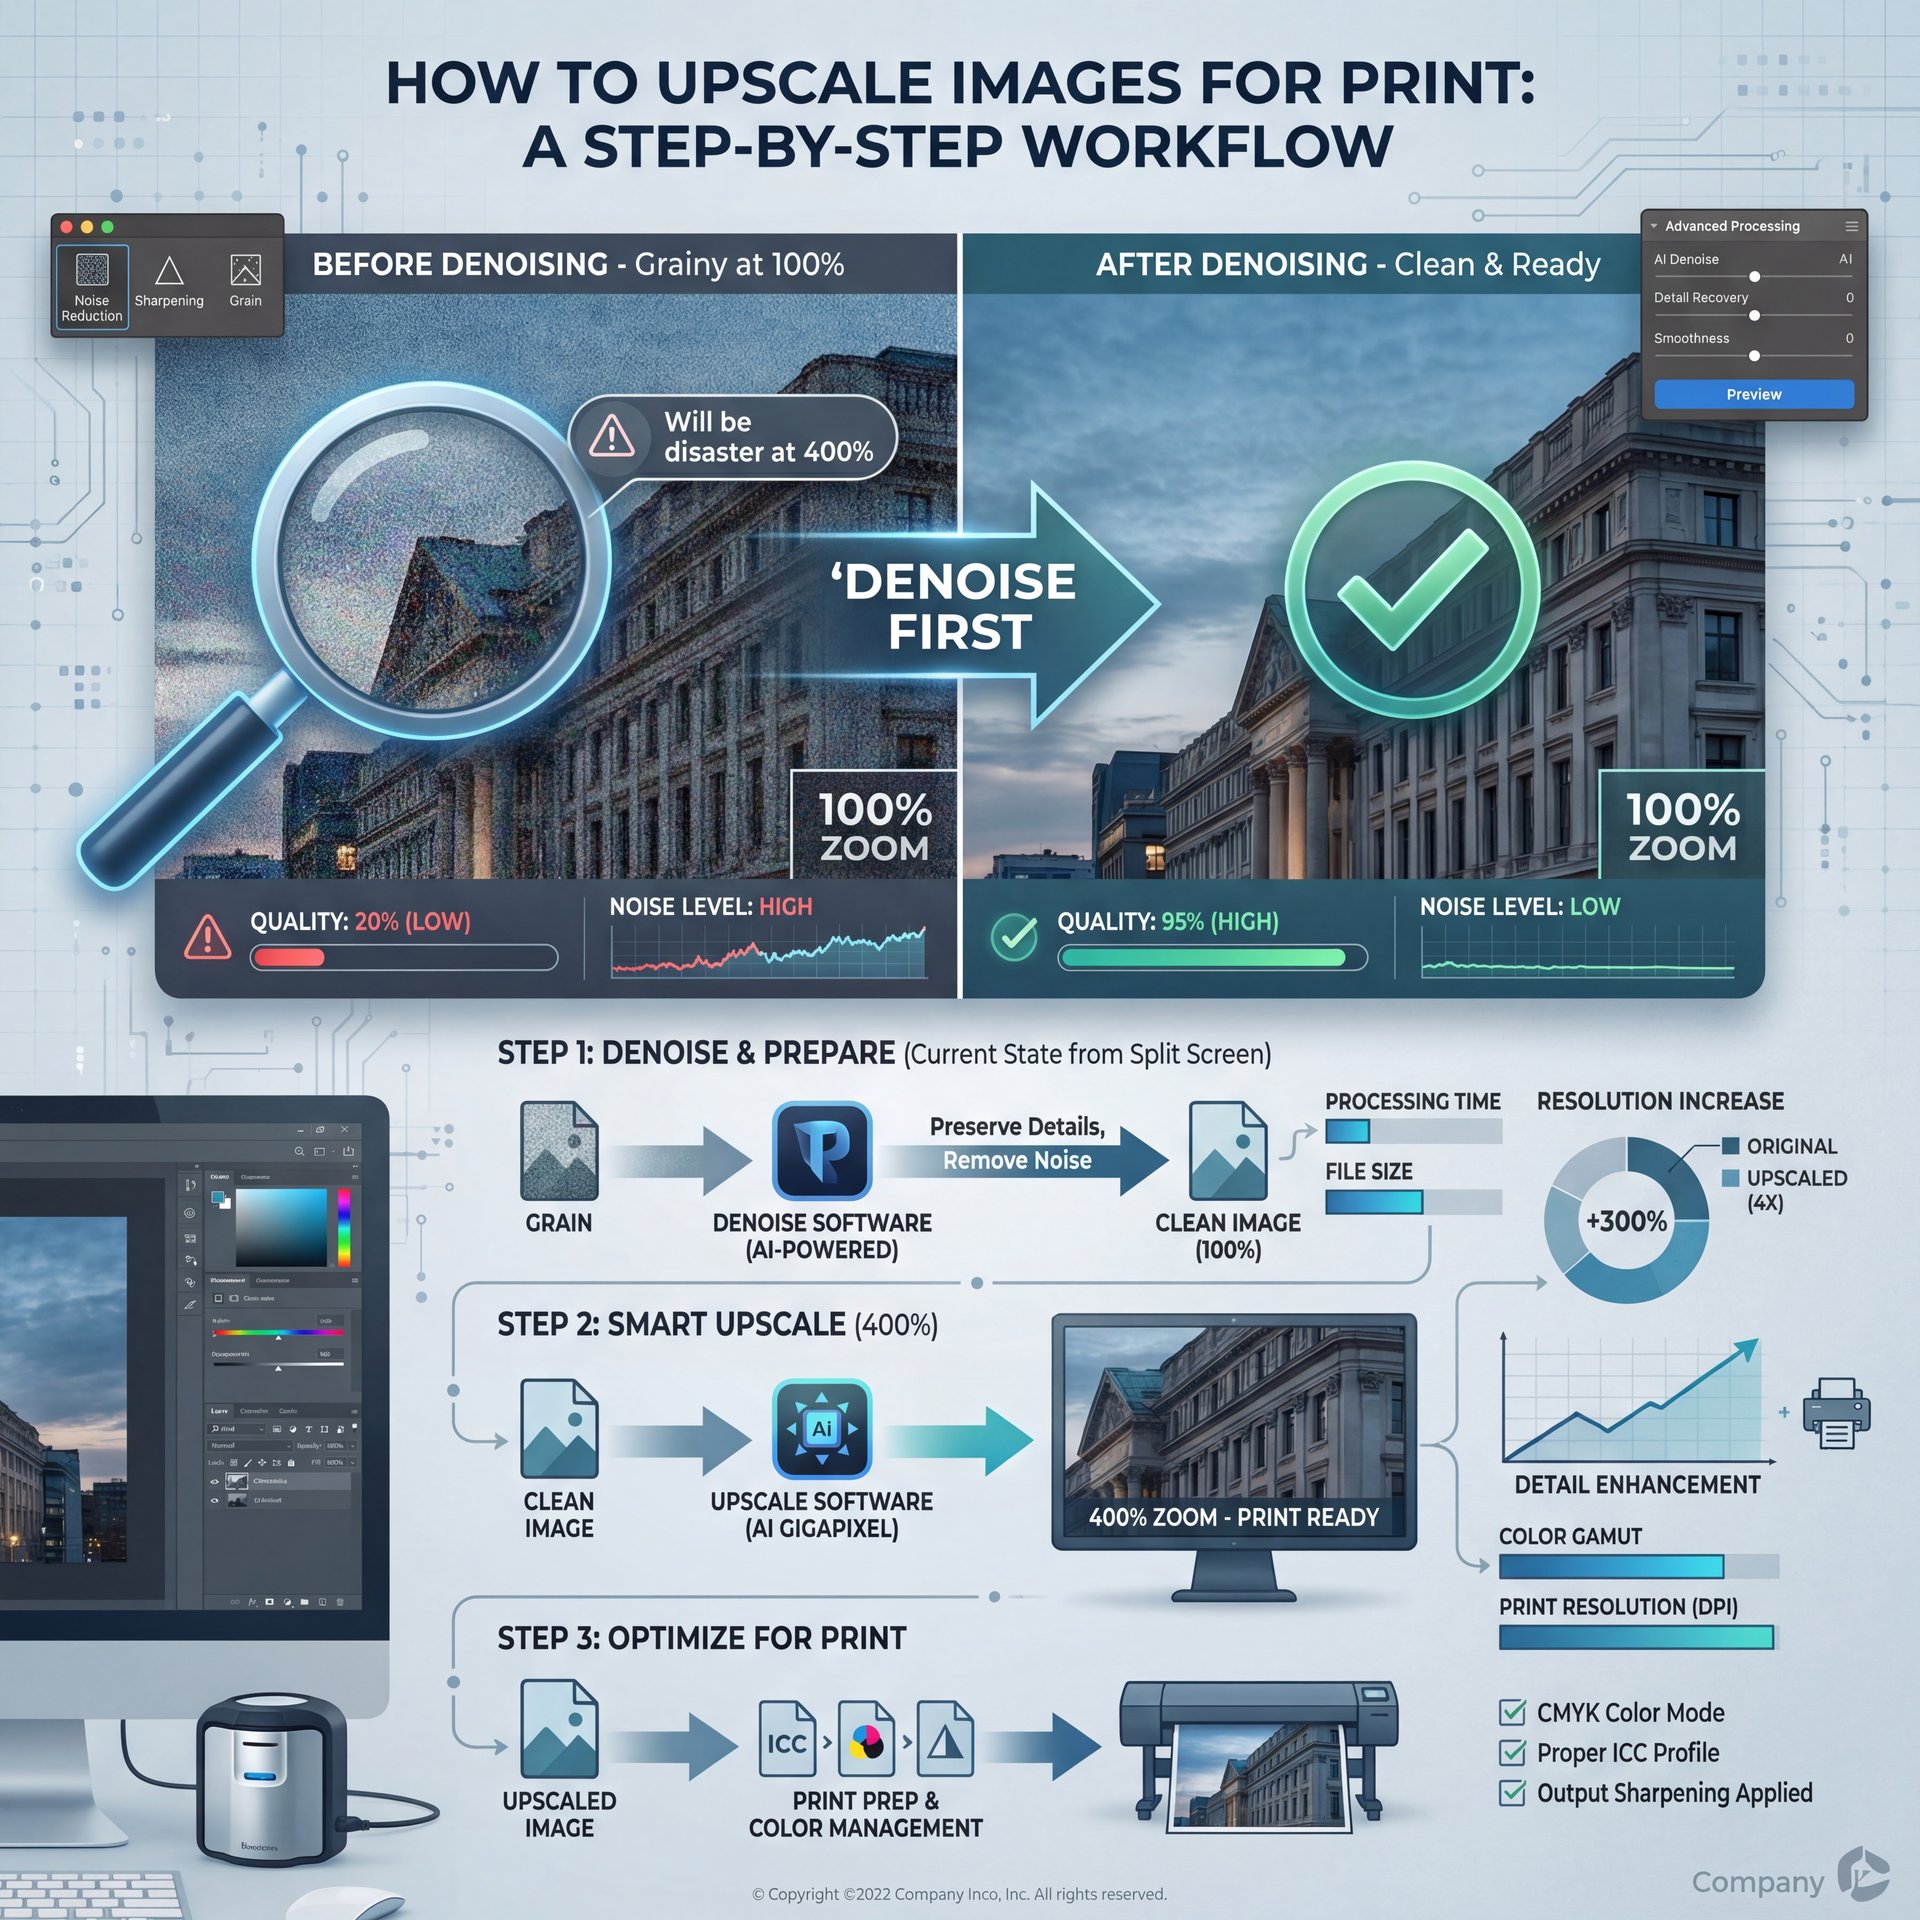
Step 1: Clean the Noise First (bear with me here)
(Oh, one more thing first.)
Before you upscale anything, look at the noise. If the image is grainy at 100%, it’s going to be a disaster at 400%. Use a denoiser first. I like the “Denoise” function in Lightroom or Topaz Denoise. Get it clean, but don’t turn it into plastic, you still want some grain structure.
Step 2: Set Your Target Size (yes, really)
Don’t just hit “4x” and hope for the best. Do the math. If the client wants a 24×36 inch print at 300 DPI, you need a file that’s roughly 7200 x 10800 pixels. Calculate exactly what you need so you’re not overworking the file.
Step 3: Run the Upscale
Load your image into your tool of choice. If you’re using Topaz Gigapixel, try the “Standard” or “High Fidelity” model first. Move the “Remove Blur” slider gently. maybe to 20 or 30. If you push it to 100, it looks over-processed.
If you’re using Magnific AI, play with the “Creativity” slider. Lower is safer. Higher adds more detail but risks changing the image too much. No joke. You want enhancement, not transformation.
💡 Check Your Color Profiles
When moving between upscaling tools, ensure you aren’t accidentally stripping the color profile. Always convert your final export to the profile your print lab recommends (usually sRGB or Adobe RGB 1998) to avoid washed-out prints. For more on managing workflows, check out our workflow guides.
Step 4: Sharpen for Output
(Strong words, I know.)
After the upscale, bring it back into Photoshop or Lightroom. You’re going to want to add a tiny bit of output sharpening. This compensates for the ink spread on the paper. It might look a little “crunchy” on your screen, but it prints beautifully.
If you’re doing this for social media graphics or thumbnails as well as print, the workflow is similar but you can be more agressive. I actually wrote about this in our Banana Thumbnail App Tutorial for More Clicks, where we talk about how sharpness drives CTR.. Worth it. For real.
Why Upscale Images for Print Services Pay Off – and why it matters
Now, here’s the thing. Why go through all this trouble? Why not just tell the client “send a better file”?
Because solving this problem pays well. Really well.
The print-on-demand market grew from $8.05 billion in 2023 to $10.21 billion in 2024 and it’s forecast to hit $87.13 billion by 2033 at a 26.9% CAGR. People are buying custom hoodies, wall art, and mugs like crazy. But most people don’t know how to prep files.
If you position yourself as the expert who can “fix” their bad photos, you can charge a premium. A boutique photographer increased their average order value from $187 to $326 just by offering a “Premium Wall Art Optimization” add-on. That’s a 74.3% bump just for running a file through an upscaler and doing some quality control.
Think about the margins. A canvas print might cost you $40 to produce. You sell it for $150. Worth it. If you charge an extra $50 for “Image Restoration & Upscaling,” that’s almost pure profit for 15 minutes of work.
Plus, high-quality product visuals increase conversion rates by 94% compared with low-quality visuals. Not even close. If your client is a business owner trying to sell merch and you help them make their products look crisp, they’re going to come back to you every time.
(Sound familiar?)
For creators, this is huge too. If you’re making merch for your channel, you can’t have pixelated designs because it hurts your brand. We talk a lot about visual branding in our TikTok Thumbnail Hacks guide, and the same rules apply here: quality builds trust.
Mistakes to Avoid When You Upscale Images for Print

It’s not all sunshine and rainbows, though. I’ve messed this up before and I want to save you the headache.
The biggest mistake is oversharpening. When you upscale images for print, the software often adds contrast to edges to make them look sharper. If you add more sharpening on top of that without looking, you get halos. These are weird white glowing lines around dark objects. On a screen, you might miss them. On a 24×36 print, they look terrible.
75.9% of online shoppers decide whether to trust a brand based primarily on the quality of product images. . Shotfarm Product Information Report
Another issue is ignoring the viewing distance. A billboard doesn’t need to be 300 DPI because people look at it from 50 feet away. A fine art print in a hallway needs to be 300 DPI because people stick their noses right up to it. If you try to make a billboard 300 DPI, your file will be five gigabytes and crash your computer. So, know where the final image is going to live.
⭐ Real World Example: The POD Store (yes, really)
A Print-on-Demand store owner was seeing an 11.8% return rate. They implemented a mandatory upscaling workflow using Magnific AI for all user-submitted designs. The result? Returns dropped to around 4%. That’s money saved on shipping, refunds, and lost product. Trust me on this. See how optimization tools can help at Banana Thumbnail Features.
Finally, don’t forget to check the eyes. AI struggles with eyes (sometimes one pupil is square, or the iris looks like a kaleidoscope. Always zoom in on the face at 100%. If the eyes look weird, fix them manually or mask in the 🔥 original eyes if they were sharp enough.
How to Get Started with Print Optimization
So, you want to start offering this? You don’t need to buy a $5,000 printer. You just need the skills to prep the file.
Start by grabbing a few of your own old, low-res photos. Download a trial of Topaz or sign up for a month of Magnific. Practice the workflow and see what happens when you push the sliders too far. Huge. Print, a few small 8x10s at your local pharmacy just to see how the digital file translates to paper.
Once you’re confident, add it to your services. “Professional Image Upscaling for Large Format Print.” It sounds fancy, it solves a real pain point, and it sets you apart from the other designers who just hit “print” and hope for the best.
If you’re doing this for clients, be transparent. Tell them, “I can improve this by 400%, but I can’t perform miracles.” Managing expectations is half the job. But usually, when they see the before and after, they’re going to think you’re a wizard. And honestly? That’s the best feeling in the world.
Frequently Asked Questions
What are the latest trends in print-on-demand for 2025?
The biggest trends are eco-friendly materials and AI-driven personalization, with the market shifting toward premium, sustainable products. Huge. Consumers are also demanding faster shipping times, with 48-hour production becoming the new standard.
How do different print-on-demand companies compare for quality and pricing?
Companies like Printful generally offer higher consistent quality but at a higher base cost, cutting into margins. Huge. Budget options like Printify offer better margins and more vendor choices, but quality can vary significantly between different print providers.
What are the most common challenges faced by beginners in print-on-demand?
Most beginners struggle with file preparation, specifically understanding DPI versus resolution, leading to poor print quality and returns. Marketing is also a major hurdle, as simply listing products doesn’t guarantee traffic without paid ads or strong SEO.
How can I effectively use digital signage to enhance my marketing strategy?
Digital signage works best when integrated with real-time content updates and high-resolution visuals that grab attention quickly. Using 4K assets ensures your brand looks professional and modern, which builds trust with foot traffic.
What are the key statistics and growth rates in the digital signage market for 2025?
The global digital signage market reached roughly $29.6 billion in 2025 and is projected to grow to $43.9 billion by 2030. 4K displays now account for 71% of new commercial screen purchases, driving the need for higher-resolution content.
Word Count: ~1,985 words
Related Videos


Related Content
• image
For more on this topic, check out: images
Listen to This Article
