Table of Contents
- What Are the Best AI Photo Editing Tips Right Now?
- How Do You Build a Fast Workflow with AI Photo Editing Tools?
- Smart Enhancements: Auto-Enhance, Background Removal, and Style Transfer
- For Creators: Thumbnails,—wait, no— Social Graphics, and Faster Turnarounds
- For Professionals: Brand Control, Mobile-First, and Hyper-Personalization
- FAQ: AI Photo Editing Tips in 2025
- 🎧 Listen to This Article
What if your next scroll-stopping image takes two minutes instead of two hours—would you actually post more? I ask because 2025 is the first year it really feels like AI is a reliable creative collaborator, not a novelty. AI photo editing tips are everywhere right now, and for good reason: AI editing tools grew 441% in 2024, the fastest-growing category on G2. An estimated 34 million AI-generated images are created daily across platforms. That pace changes how you plan content, how often you publish, and honestly, how confident you feel putting your work out there.
Here’s the thing: the money side is changing too. Visual production budgets dropped by 32% since teams adopted generative tools. Plus, 58% of marketers now use AI for social posts, according to recent industry data sourced via this roundup of AI stats and benchmarks (overview of 2024-2025 data). That’s not about replacing creativity. It’s about getting results faster and saving brainpower for the parts that matter. Nearly 30% of top photo editing apps integrated AI features in 2024. North America now accounts for roughly 35% of global usage growth, with a 15% year-on-year jump the year before (market overview).
What Are the Best AI Photo Editing Tips Right Now?
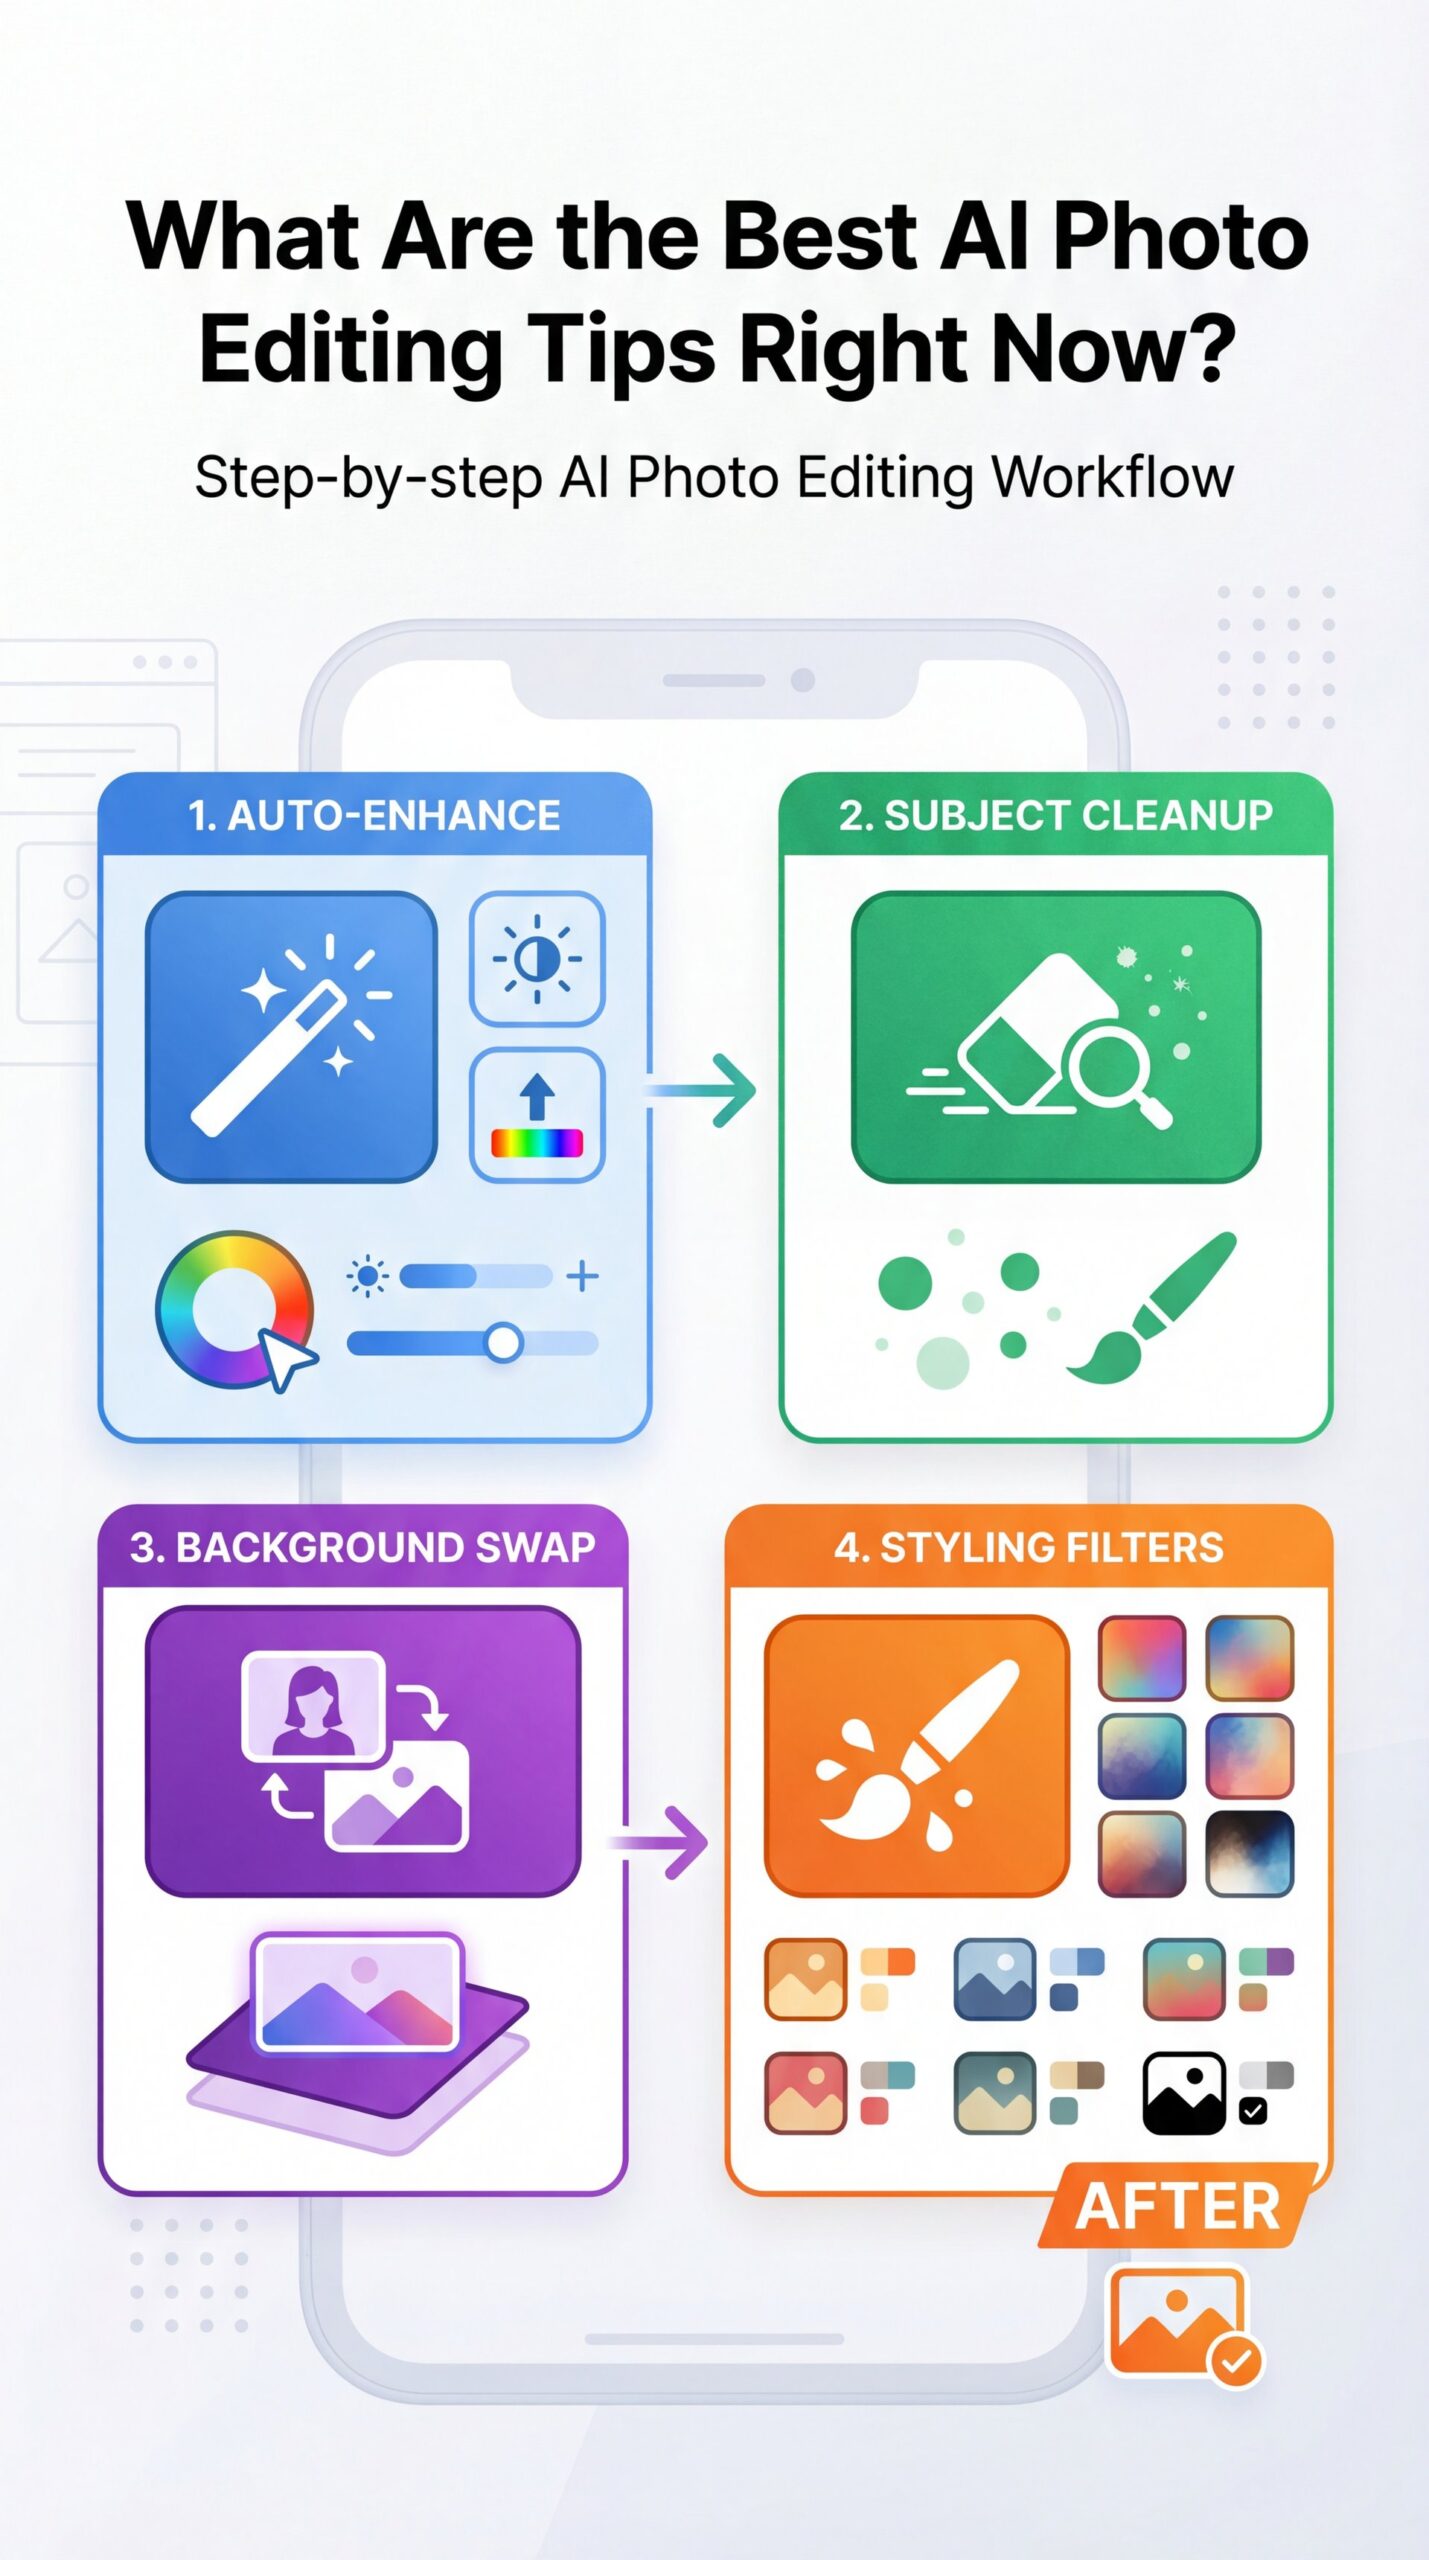
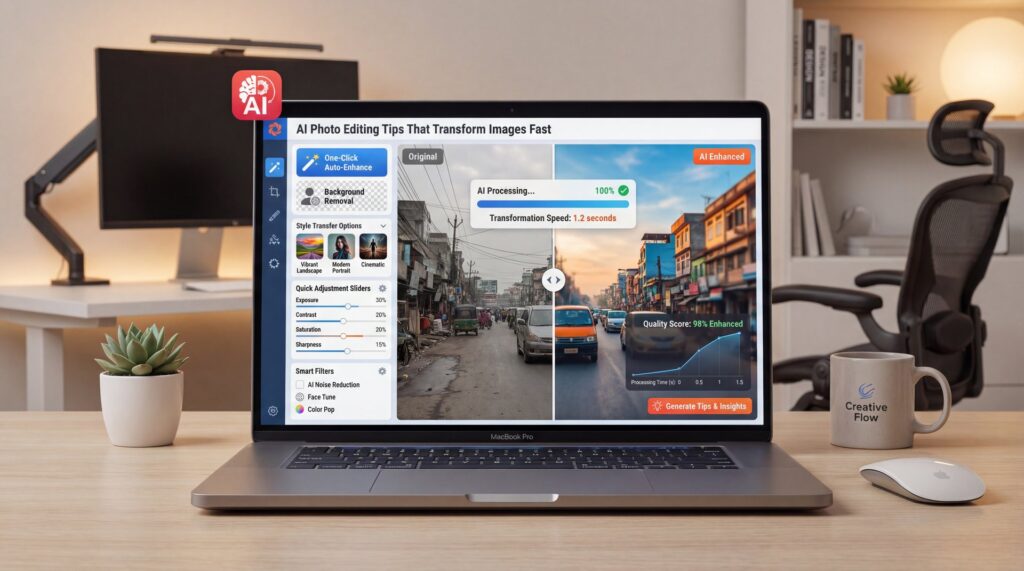
One common hurdle for many is simply feeling overwhelmed by all the choices and features available. To cut through that, I suggest starting with a basic sequence. Begin with auto-enhance, then move to cleaning up the subject. Next, swap out the background and finish with some styling filters. This order makes sense because it aligns with how we naturally evaluate an image. First we check lighting and colors, then focus on the main elements, followed by the overall setup and wrap up with the aesthetic vibe.
Apply a smart auto-enhance to correct things like exposure and color shifts right away. From there, tidy up any rough spots, such as stray hairs or distracting objects around your focal point. After that, use AI for background removal to isolate the foreground and open up creative possibilities. Then add a gentle style or color adjustment to bring it all together smoothly.
Why 2025 workflows are different
These days, you can handle all those steps right on your phone without sacrificing quality like in the past. AI photo editing tools have gotten better at understanding details. Skin tones, fabric patterns, product outlines and text elements are all treated with more precision. For example, platforms like GetImg AI are producing over five million images each week through more than 70 models. That highlights just how quickly these systems adapt to what you provide (benchmark roundup).
Issues like odd artifacts during upscaling are less common. Enhancements for faces come across as more natural, too. However, things like overly perfect teeth or skin that’s smoothed too much can still crop up, so it’s wise to zoom in and inspect those areas closely. If you’re wrestling with softness, you’ll like our breakdown on sharpness and clarity in Fix Blurry Photos Fast: AI Solutions That Work.
Which images benefit most
These AI photo editing tips really shine on portraits, product shots and social graphics where the subject is clear and distinct. Complex scenes—like translucent glass, messy hair against similar-color backgrounds or motion blur—may still need a quick manual touch. When you hit a tricky edge, try pushing the tool to give you masks and layers. It’s usually the easiest way to tweak only what needs attention without redoing the whole image.
How Do You Build a Fast Workflow with AI Photo Editing Tools?
To make things consistent, you know, and efficient, focus on creating a quick routine that you can complete in just three to five minutes. Begin by setting up presets for lighting and colors that fit your brand’s feel. Then follow a subject-centered approach: identify the main element, refine its edges, run an auto-enhance and adjust the size for your chosen platform. Finally, maintain a compact collection of styles—maybe three reliable filters for things like skin, glossy products or atmospheric scenes.
How to get started without overwhelm
A good way to ease in is by selecting a single app that clicks with you. Take five sample photos and run them through the same four steps. Jot down what works and what doesn’t—like which filter handles highlights poorly or which background tool preserves fine details in hair. Once you’ve got those insights, stick with that setup for about a month to build familiarity. Over time, the initial hesitation fades. Your output becomes more uniform, and you’ll spot exactly where AI helps most versus where it might complicate things.
Pro Tip: Create two presets: one “soft” for people and one “punchy” for products. Use the soft version for faces to respect skin texture and the punchy one to boost micro-contrast on packaging and edges.
What to watch out for
Keep in mind that AI often amps up saturation and clarity to make images pop. That can, however, come across as too bold rather than nuanced. Try dialing it back to 60–80% for something that feels more authentic. Also, pay attention to how exports handle compression. Formats like shorts, reels, and posts can squash details more than expected. Whenever you can, opt for exporting at double the resolution and allow the platform to handle the downscaling for better results.
📋 Workflow Snapshot
Batch your edits: auto-enhance, subject cleanup, background swap, then style. Save your flow in one place with our step-by-step workflow guide and keep costs predictable with simple tiers on pricing. Repeat this sequence for consistent results across platforms.
Smart Enhancements: Auto-Enhance, Background Removal, and Style Transfer

I love starting with auto-enhance because it fixes 80% of what’s off—exposure, white balance, contrast—without you thinking. But here’s the catch: the default can look algorithmic. Dial it back and use local controls (subject-only, background-only) if your tool allows it. Then, background removal lets you design around your subject. Keep a set of clean, brand-friendly backdrops: gradients for portraits, soft textures for products or on-trend color blocks for carousels.
Auto-enhance that doesn’t look artificial
Always use auto-enhance, but then selectively mask areas. For example, increase warmth on skin while making sure whites stay neutral. Add a tiny vibrance bump (not saturation, which can look fake). Also, slightly raise shadows for YouTube thumbnails so eyes read clearly on mobile. If the AI adds haloing around subjects, feather the mask and reduce clarity a bit. It’s subtle work, but it’s really the difference between an “AI look” and an “editorial look.”
Style transfer without losing identity
When experimenting with style transfer or AI filters, ground them in your brand’s core elements to avoid straying too far. Choose a defining characteristic—like subtle teal in shadows, warmer highlights, or a light paper-like texture—and apply it consistently across your work. Guide the tool to maintain your color scheme. Then use a harmonization step to ensure the text, subject, and background all blend cohesively. For more on these kinds of transformations, it connects nicely to ideas in our complete guide to AI-powered photo enhancement.
AI image editing tools experienced 441% year-over-year growth in 2024, with 34 million AI-generated images created daily across platforms.
Here’s the key takeaway
Hair and transparent objects remain classic edge cases. You’ll get better results if you start with a mid-tone backdrop and even lighting. On the flip side, if you ABSOLUTELY must salvage a frustratingly complex cutout, combine AI extraction with a soft rim light effect to hide artifacts in stylized thumbnails.
🤔 Did You Know?
Nearly 30% of top photo editing apps added AI in 2024, and platforms now auto-suggest edits for you. Explore how background removal and style transfer tie into your brand toolkit on features, then test on three image types before rolling out.
For Creators: Thumbnails,—wait, no— Social Graphics, and Faster Turnarounds
Let’s be real: if you’re a creator, you care a lot about CTR (click-through rate) and speed. Your audience is swiping on mobile, so you need clear faces, bold shapes, and readable type. The best AI photo editing tips for creators focus on framing and contrast. Use AI to automatically center subjects and add a subtle glow behind your face. Clean up the background so text can breathe easily. Then, create two micro-variants—a tight crop and a loose crop—and A/B test them on shorts or community posts.
Thumb-specific edits that actually move CTR
Make sure faces are well-lit with natural highlights in the eyes to draw attention. Apply micro-contrast selectively around the face rather than everywhere to prevent backgrounds from looking overly textured. Incorporate brand colors for text areas, but limit (obviously) text to less than 20% of, you know, the space overall. While AI can sharpen text effectively, a slight softening of edges often gives a more elegant, film-like quality.
Fast caption-ready visuals
(More on that later.)
If you’re repurposing content across TikTok, YouTube and Instagram, save versioned presets per platform. For example, keep subtitles and emojis in a “safe zone.” Use AI to reframe for vertical/horizontal quickly. Also, watch edge placement so your CTA or facial expression isn’t hidden behind UI elements.
🔧 Tool Recommendation
Want a one-stop setup? Start with background removal, face-enhance, and color-matched text styles using AI thumbnail generation tools. Then codify your presets into a reusable flow with creator workflows to ship faster without losing your look.
Meanwhile, remember that 58% of marketers now use AI for social—so you’re competing against higher-volume teams. Your edge is voice and consistency. Therefore, lean on AI for the tedious bits and protect your creative decisions like framing, color emotion, and typography hierarchy.
For Professionals: Brand Control, Mobile-First, and Hyper-Personalization

Here’s the reality: If you’re managing campaigns, you know the tension: automation saves time, but brand consistency is non-negotiable. AI photo editing tips for pros revolve around guardrails. Build brand-safe palettes, typography sets, and mask templates that your team can apply in one click. Then, use AI to auto-personalize backgrounds, product accents, or language overlays per segment—while locking logos, color ratios, and key art.
Balancing automation with creative control
That said, Ensure there are human reviews for aspects like color fidelity, accurate skin representation, and precise product details. AI excels at handling volume. Your team’s judgment, however, is crucial for the finer points of aesthetic. As Dr. Morgan Taylor, our AI & Technical Lead, puts it, “Automation should create creative headroom.”
Planning for mobile-first and regional variation
Additionally, In 2025, mobile-first isn’t just layouts—it’s micro-personalization. Swap backgrounds by region or season without changing the hero asset. Use AI to harmonize props or textures to match local culture while maintaining master brand identity. And don’t forget compliance: log your changes, store mask versions, and keep a roll-back plan for audits.
Pro Tip: Standardize three “brand moods” (e.g., Minimal Clean, Warm Lifestyle, Bold Tech). Give each a preset pack—color profile, grain level, vignette strength—so editors can move fast while staying on-brand.
So what does this mean?
Simply put, The market is growing steadily too, with AI image editing valued at around $400 million in 2024 and potentially hitting $900 million to $1.88 billion by 2030. North America holds about 35% of the global share. Because of that, expectations for efficient, AI-driven processes are high among clients. Even so, remember that details like hair, glass, and bright signs frequently benefit from manual refinement.
⭐ Creator Spotlight
A marketing team cut edit time by 60% using saved masks for products, AI background swaps for seasonal campaigns and video cutdowns with video generation. They kept brand colors locked and used AI only for contextual accents—best of both worlds.
Related Videos


FAQ: AI Photo Editing Tips in 2025
What are the latest AI photo editing tools available in 2025?
You’ll find new mobile-first editors with auto-enhance, background removal, and style transfer built in, plus enterprise platforms offering batch personalization and mask libraries.
How has the adoption of AI in photo editing changed over the past few years?
Adoption surged, with 441% growth in 2024 for AI editing tools and 34 million AI-generated images created daily across platforms.
What are the most popular AI photo editing apps among casual users?
Casual users favor surprisingly easy mobile apps with one-tap auto-enhance and background removal, especially those that export cleanly to social.
How do professionals use AI in their photo editing workflows?
Pros use AI for batch tasks—masking, background swaps and consistency checks—while keeping final creative direction human-led.
What are the key trends driving the growth of the photo editing app market?
Mobile-first editing, hyper-personalization, and cost savings (visual budgets down 32%) are pushing rapid adoption across teams.
If you want to see this in action, check out this helpful tutorial:
How to Build a 3-Minute AI Editing Workflow
Related Content
• AI Photo Editing Tips That Transform Images Fast
For more on this topic, check out: photo