Table of Contents
- How Does Removing Text from Images Actually Work?
- Best Tools to Remove Text from Images in 2025
- Why Use AI to Remove Text from Photos? (The Data)
- Common Mistakes When You Replace Text in Images
- How to Remove Text from Images Cleanly (Step-by-Step)
- Remove Text from Images vs. Masking: Which Is Better?
- Listen to This Article
Here’s the thing about finding the perfect – like, really perfect image for your project. You spend twenty minutes scrolling, you finally see the one that stops the scroll, but then you realize it’s got a massive watermark or some random text plastered right across the best part. It’s frustrating, right?
I used to spend hours in complex software trying to clone stamp that stuff out pixel by pixel. It’s the transmission of your workflow — design connects everything. Honestly, it was a nightmare. But today, we’re gonna go over how to fix this fast. Because in 2025, you don’t need to be a graphic design wizard to clean up your photos.
So, whether you’re a YouTuber trying to repurpose a thumbnail, a business owner fixing up product shots, or just someone trying to clean up a meme, I’m going to show you exactly how to remove text from images and replace it with your own style. And we’re going to do it without the headache.
(Bear with me for a second.)
How Does Removing Text from Images Actually Work?
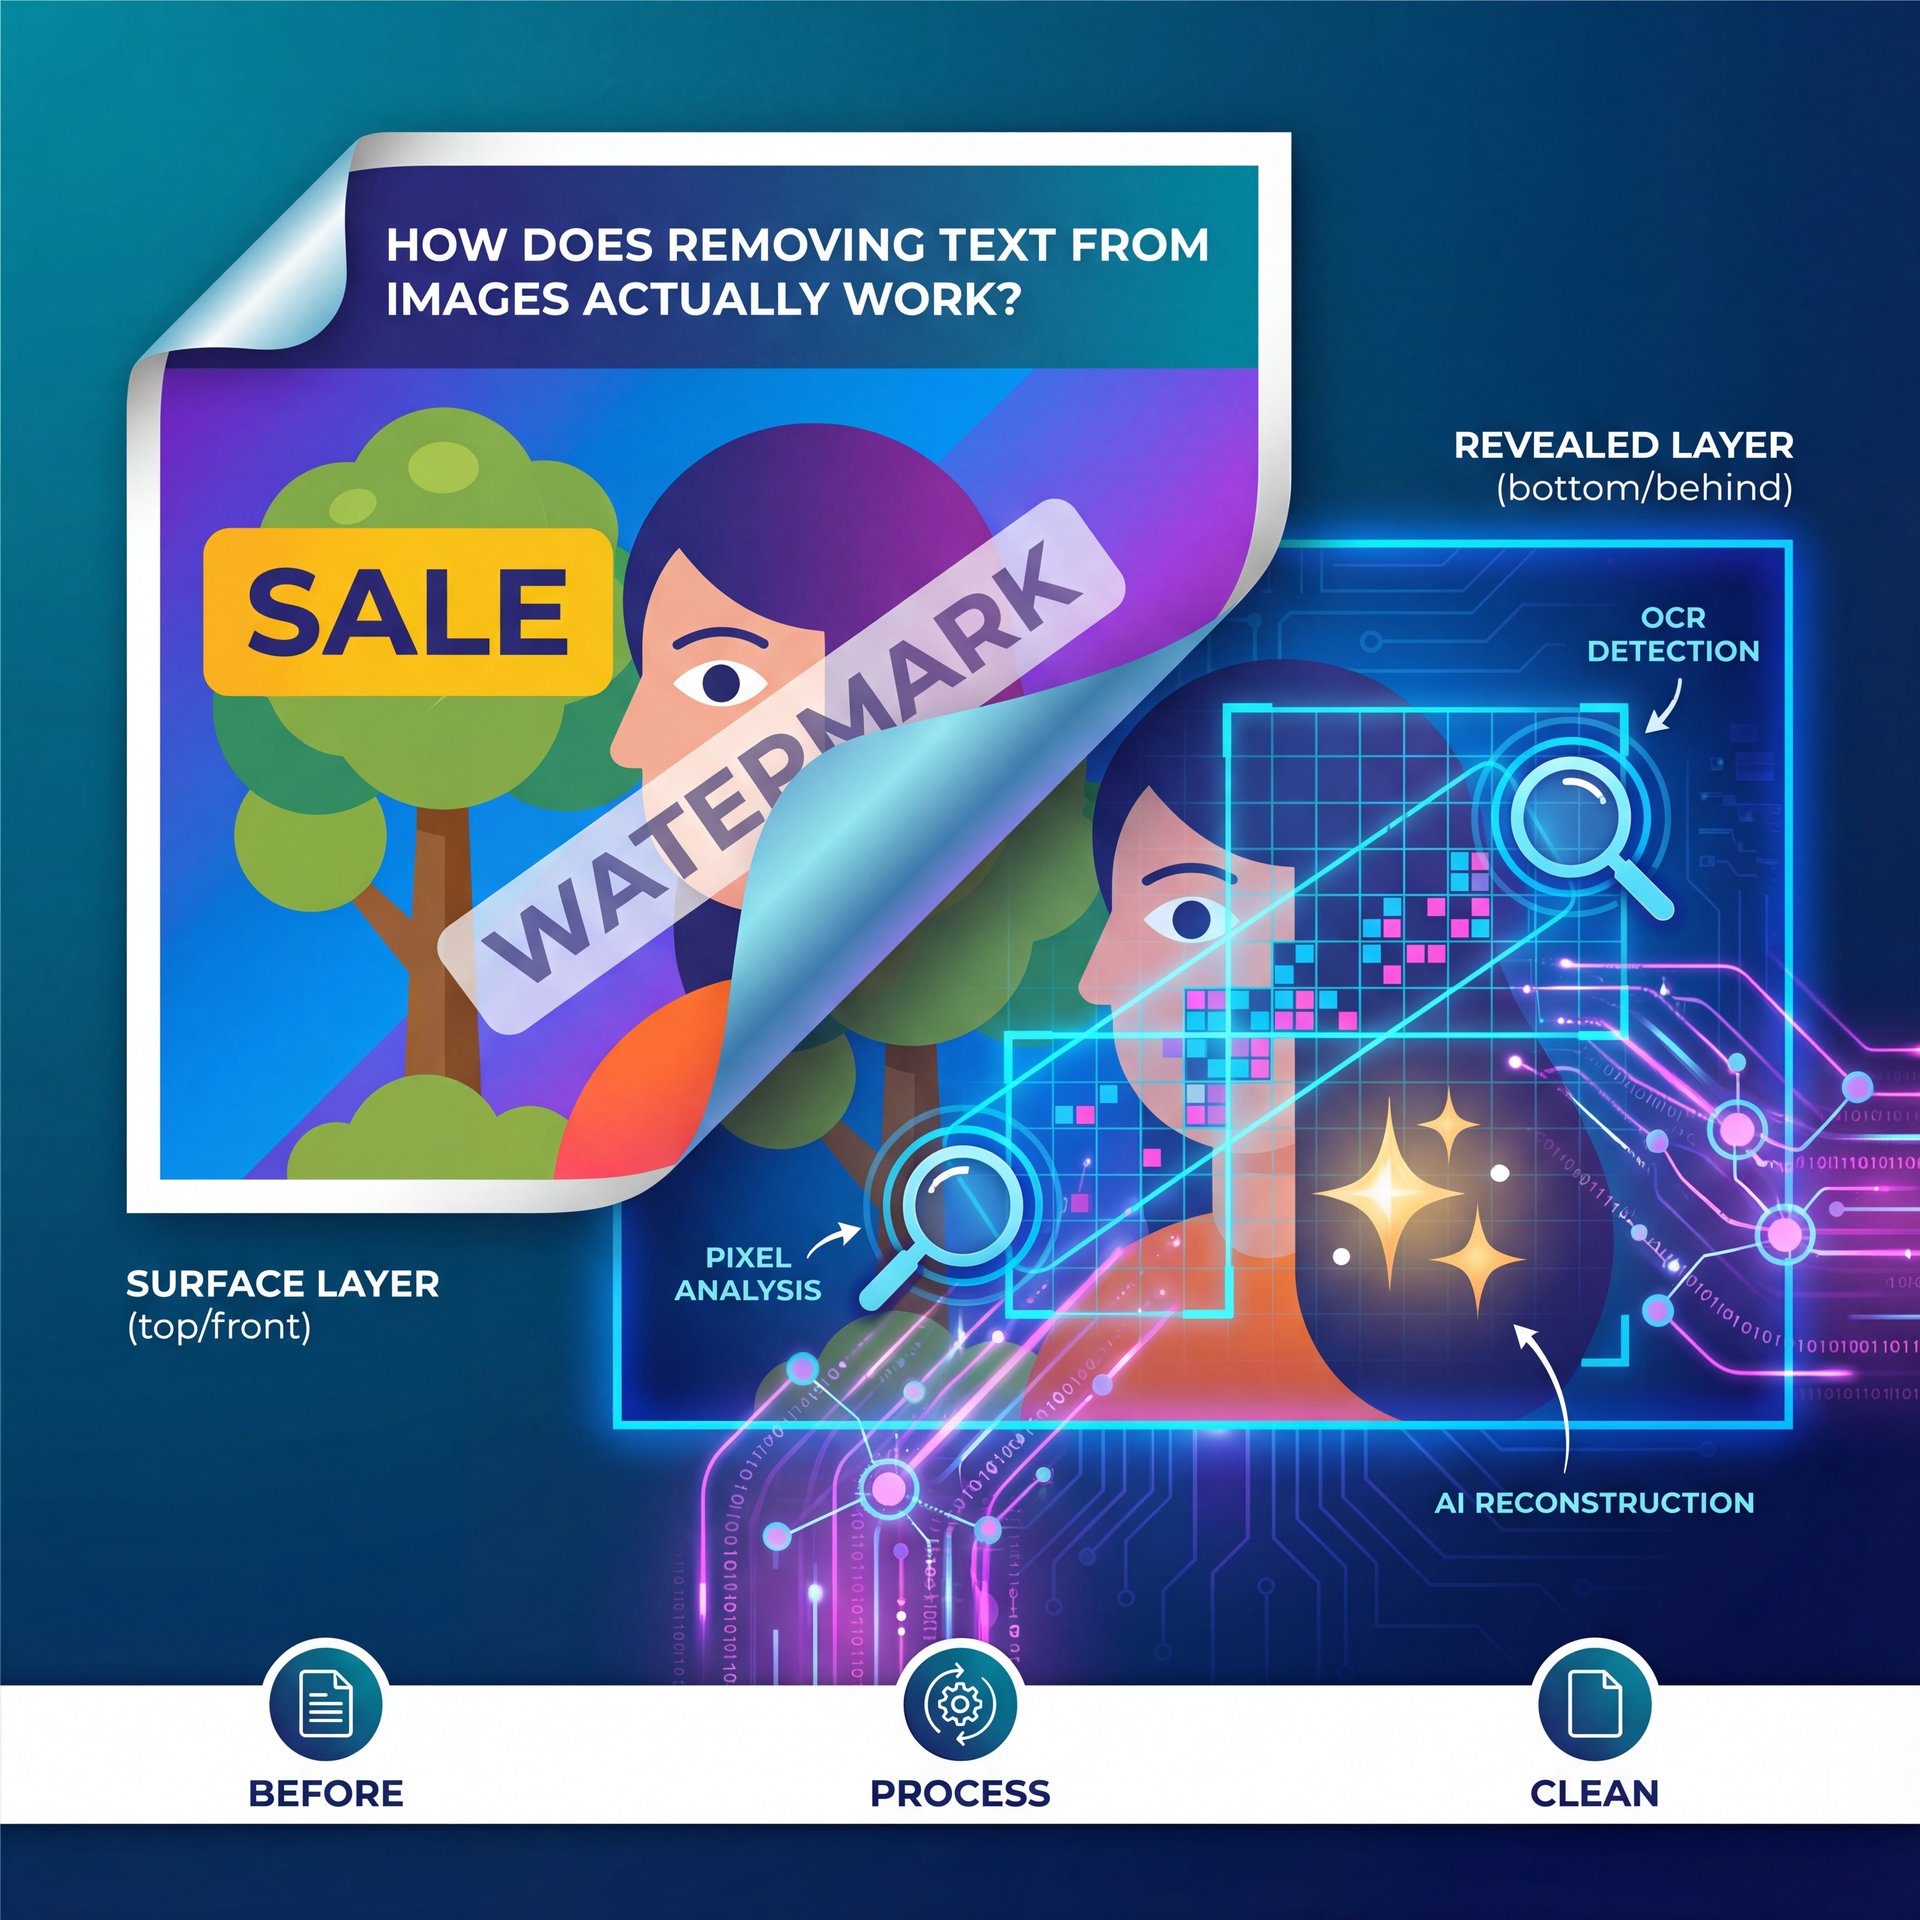
So let’s cover the basics real quick. You might be wondering how these tools actually know what’s behind the text. Consider tool the spark plug — small but essential. I mean, if the text is covering the pixels, how does the computer know to put a tree there, or a face, or a gradient background?
It comes down to two main pieces of tech working together. First, you have OCR—that stands for Optical Character Recognition. This is the part that “reads” the image. In my experience, the latest tools like Microsoft Azure’s Document Intelligence are hitting about 96% accuracy on printed text. That’s huge because the software needs to know exactly where the text is before it can get rid of it.
Then comes the second part, which is the generative fill or “inpainting.” Think of it like patching a hole in drywall. You don’t just slap tape over it. You fill it, sand it, and paint it to match the surrounding wall SO nobody knows there was ever a hole there. That’s what tools like PhotoRoom and Photoshop are doing digitally. They look at the pixels around the text—the texture, the lighting, the shadows, and they generate new pixels to fill the gap.
🧠 Did You Know?
Modern OCR technology is getting scary good. According to a 2025 benchmark by AIMultiple, AWS Textract achieved 99.3% accuracy on clean images. This means the software rarely “misses” a letter when you’re trying to wipe a caption.
What surprised me when I first started using the newer AI tools was just how clean the results were. We aren’t just blurring things out anymore; we are rebuilding the image.
Best Tools to Remove Text from Images in 2025
Now, if you wanna get this done, you need the right gear. It’s like trying to take off a lug nut (you can struggle with a pair of pliers, or you can just grab the impact gun and be done in two seconds.
Here are the tools I’ve been using lately that actually deliver.
Adobe Photoshop (Generative Fill)
If you have the budget, Photoshop is still the heavy hitter. Their Generative Fill feature is incredible. I found that it handles complex backgrounds, like a brick wall or a forest. better than almost anything else. You just circle the text, hit generate, and it’s gone. But, it’s $9.99/month minimum, so it’s not for everyone.
PhotoRoom
For e-commerce folks, PhotoRoom is a beast. I’ve seen this tool handle batch processing like a champ. If you have 50 product photos with the wrong price tag on them, you don’t want to edit them one by one. Not kidding. PhotoRoom can automate that. Plus, they’ve grown like crazy, reaching 21.6 million monthly visitors and securing $64 million in funding by 2024. because their removal tool is just that simple to use.
Canva (Magic Eraser)
Most of us are already in Canva. Their Magic Eraser is solid for simple backgrounds. The numbers after using design speak for themselves. It’s part of the Pro plan ($12.99/mo), and while it might struggle with super complex textures compared to Photoshop, for social media posts, it’s usually plenty. In fact,—wait, no— Canva’s AI tools processed over 6.five billion AI-generated designs in 2023, with double-digit usage increases into 2024.
🛠️ Tool Recommendation
If you’re dealing with hundreds of product images, don’t do it manually. PhotoRoom specializes in batch workflows. Check out how automated workflows can save you hours at Banana Thumbnail Workflows.
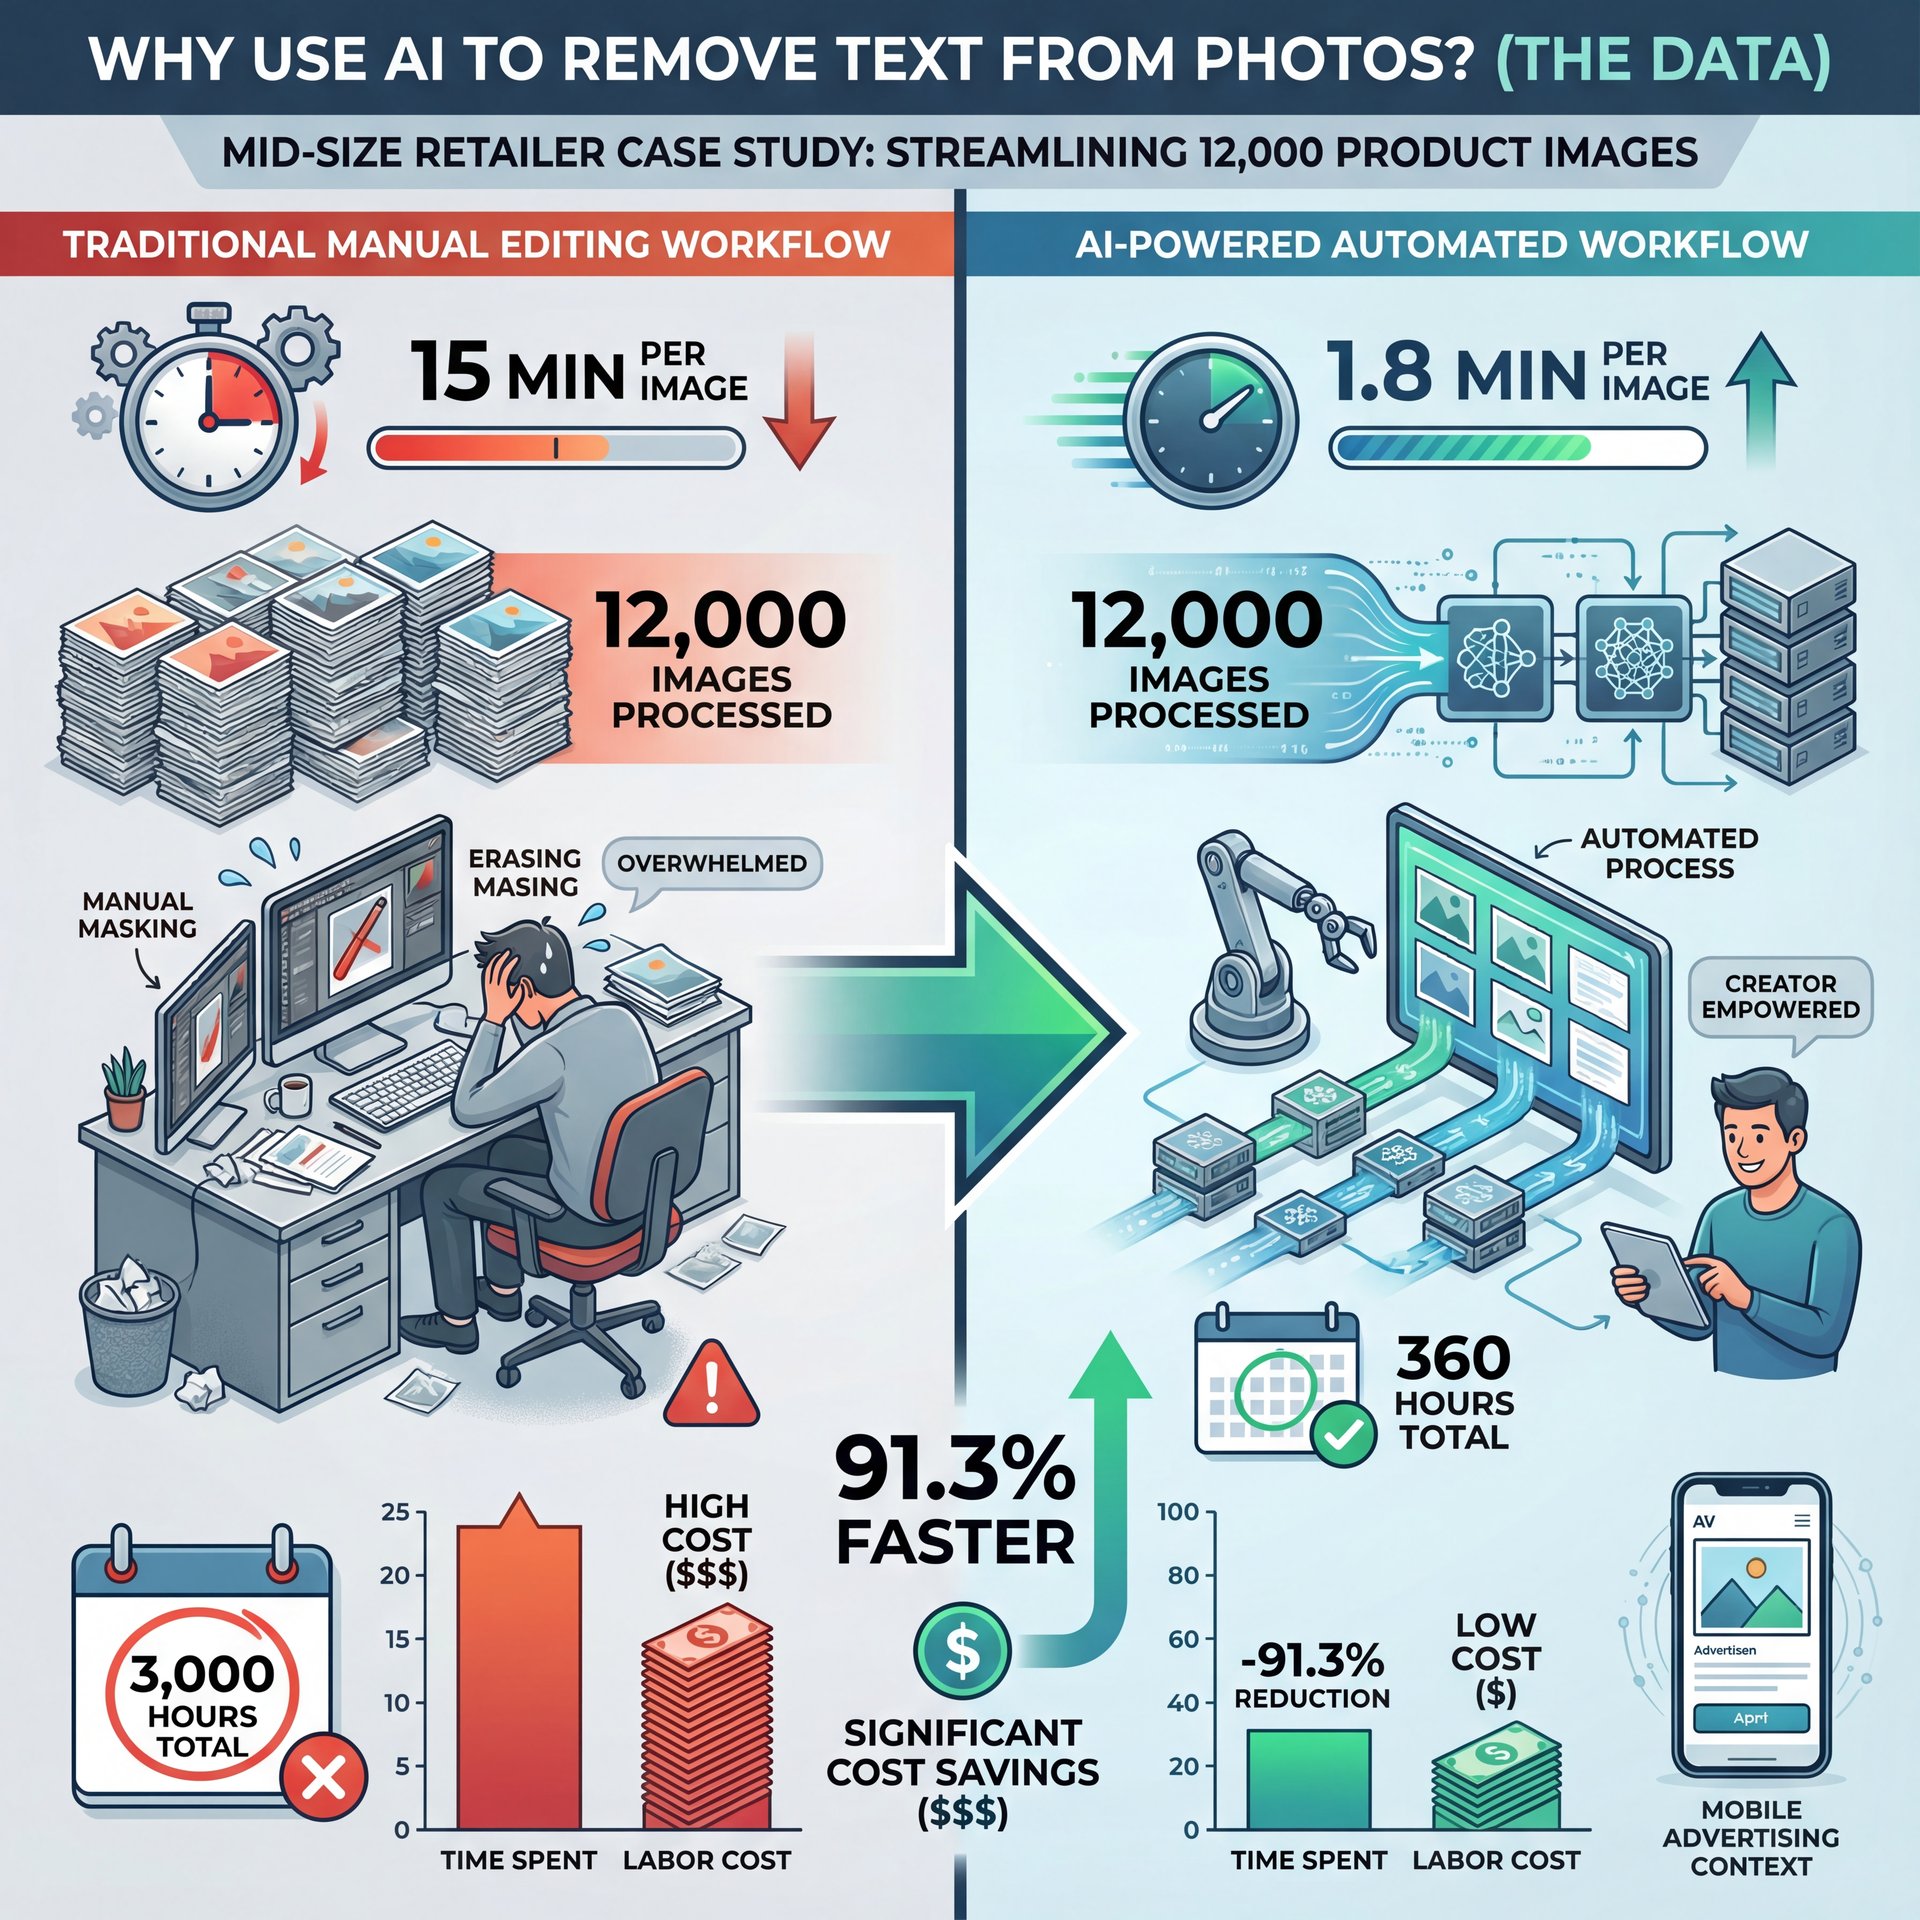
Why Use AI to Remove Text from Photos? (The Data)
So, why does this matter? Why not just crop the image or find a new one?
Here’s the thing: speed and money. I read a case study about a mid-size retailer that used AI removal tools for their product catalog. They cut their editing time from 15 minutes per image down to about 1.8 minutes (that’s a 91).3% reduction. They processed 12,000 images in 360 hours instead of 3,000 hours. When you’re running a business, that time saved is money in your pocket.
Also, mobile advertising is exploding. Consider How the GPS here — it tells you where to go. Global digital advertising spending is forecast to reach $835.82 billion in 2026, up 59.9% from $522.five billion in 2021. If your ad has text that’s cut off or hard to read on a phone screen, you’re throwing money away. Being able to quickly remove old text & replace it with centered, legible typography for TikTok or Reels is really critical, super critical.
I mean, those numbers speak for themselves. Cleaner images usually mean better engagement. The adoption numbers back this up too (78% of organizations reported using AI in their business in 2024, a 55% increase over the previous year. If you’re interested in how visual tweaks can drive clicks, check out our guide to TikTok thumbnail hacks, which covers similar principles for short-form content.
Common Mistakes When You Replace Text in Images
All right, so you’ve wiped the text. Now you want to put your own message on there. But here’s where a lot of people mess up.
I see this all the time. someone removes the original text, but the new text looks… fake. It floats. It doesn’t look like it belongs in the photo.
The “Floating Text” Problem
When you take a photo of a street sign, the text on that sign has shadows, grain, and maybe a little blur. If you slap perfectly sharp, pure white digital text on top of it, it looks wrong.
Pro Tip:
Pro Tip: When replacing text, always add a tiny bit of “noise” or grain to your text layer to match the quality of the original photo. If the photo is a JPEG, your text shouldn’t look like a vector SVG.
Ignoring Perspective
This is a big one. If the original text was on a wall that was angled away from the camera, your new text needs to be angled too. You can’t just type flat text over a slanted surface. Consider tool the spark plug — small but essential. In tools like Canva or Photoshop, use the “perspective” or “distort” tools to match the angle.
Sketchy Font Matching
(Just my two cents.)
If you’re trying to mimic the original look, you have to get the font right. Means I use tools like WhatTheFont to identify the original typeface before I scrub it. It makes the replacement look seamless.
⚠️ Common Mistake
Don’t forget the shadows! Real text on objects usually casts a shadow or has natural lighting highlights. If you remove text and replace it with flat color, it looks pasted on. For real.. Use “drop shadow” effects sparingly to ground your text. Learn more about visual consistency at Banana Thumbnail Features.
How to Remove Text from Images Cleanly (Step-by-Step)
So, let’s get our hands dirty. Here is the workflow I use when I need to swap text on an image. It’s pretty straightforward, but you have to follow the order.
Step 1: Analyze the Background
Before you do anything, look at what is behind the text. Is it a solid color? Is it a complex pattern? If it’s a solid color, you might not even need AI. just a simple brush tool will do. But if it’s complex, you’re going to need the generative tools we talked about.
Step 2: Make the Selection
Grab your selection tool. In Photoshop, this is the Lasso tool. In PhotoRoom or Canva, you usually just brush over the area.
Here’s a trick I learned: don’t select just the text. Select a little bit of the background around the text too, which means this gives the AI some “context” pixels so it knows what texture to blend in. If you select too tight to the letters, you often get weird artifacts.
Step 3: Generative Fill / Erase
Hit the button. Let the AI do its thing. Now, check the result. Does it look blurry? If so, undo it and try selecting a slightly larger area. Sometimes the AI just needs more information to make a quality guess.
Step 4: Clean Up Artifacts
Sometimes you’ll get what we call “hallucinations”, the AI might put a weird line or a random object where the text was. Just use a standard healing brush or clone stamp tool to tap those out manually. It takes two seconds but makes a huge difference. If you are dealing with blurry results, you might want to look at our article on fixing blurry photos for some specific techniques on sharpening up those edited areas.
Step five: Add New Text
Now, type out your new message. Match the color, match the angle, and match the grain. If the original text had a glow, add a glow. If it had a border, add a border.
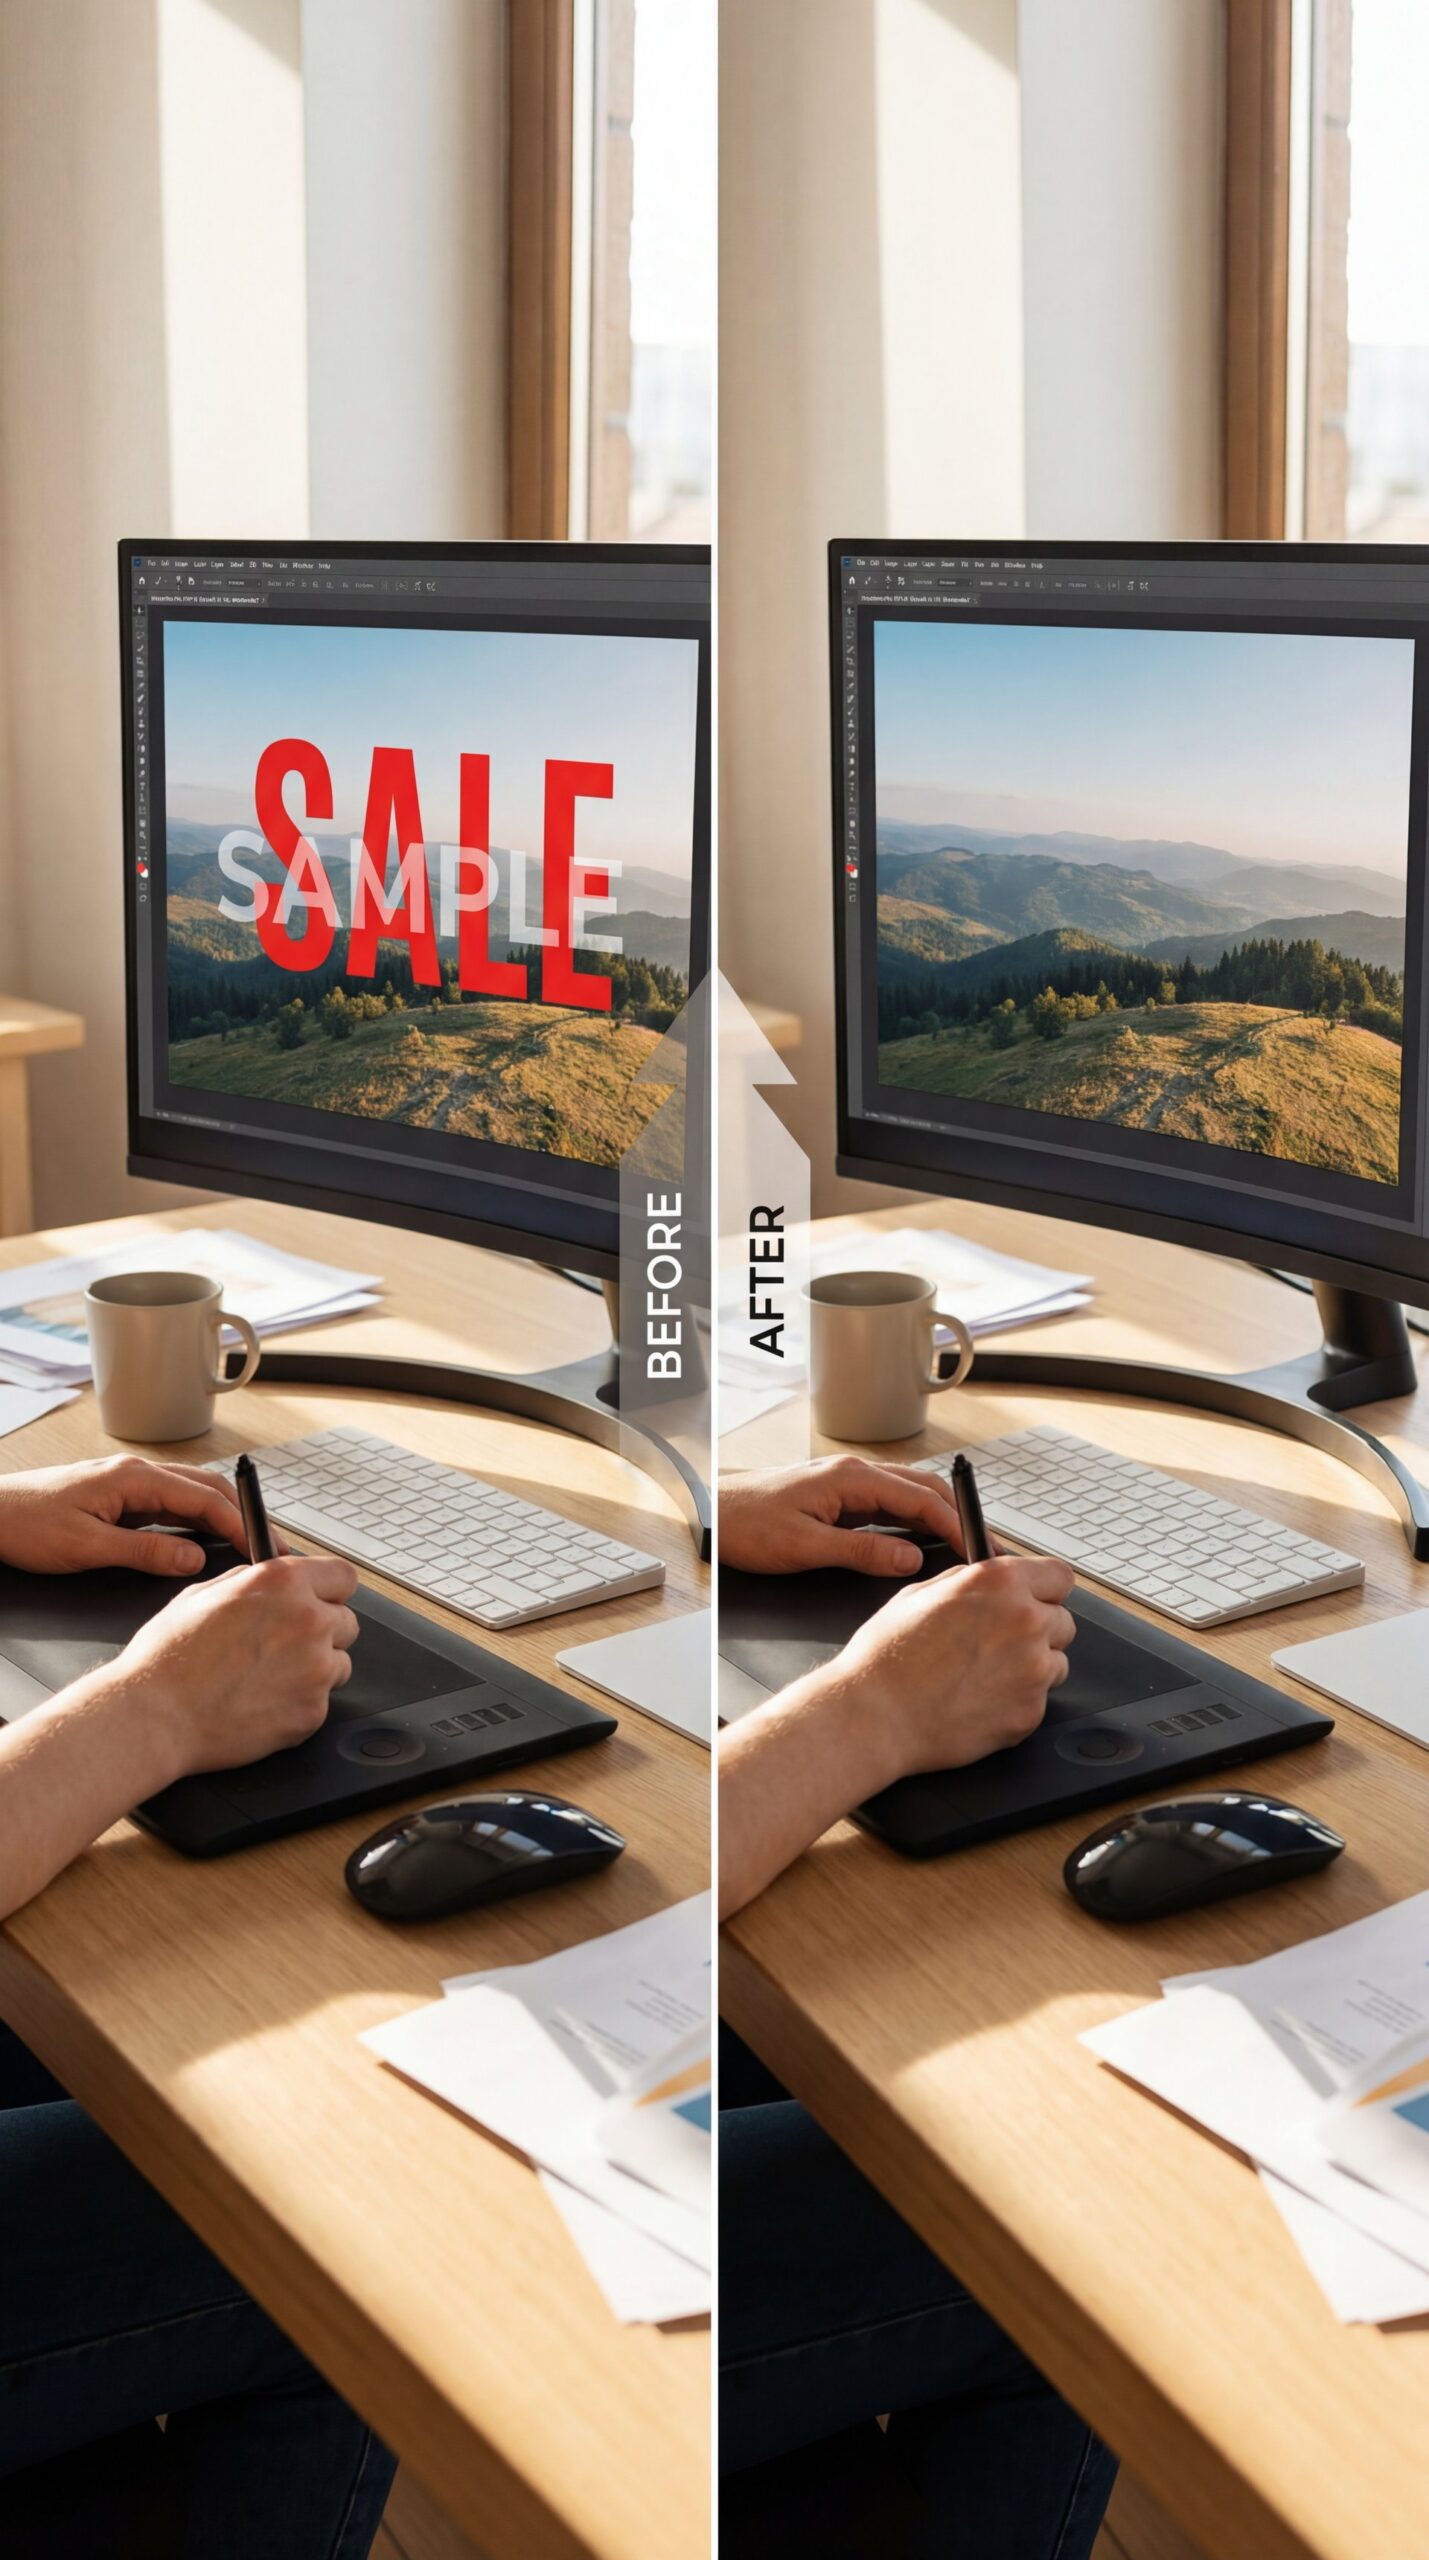
📊 Before/After
Before: A product image with a confusing English description.
After: The same image with a localized Spanish description, done in under 2 minutes.
This simple swap allows brands to enter new markets without reshooting photos. See how we handle localization at Banana Thumbnail Pricing.
Remove Text from Images vs. Masking: Which Is Better?
I get asked this a lot: “Should I remove the text, or just put a box over it?”
Honestly, putting a box (or a “mask”) over the old text is the lazy way out. And sometimes, that’s fine! If you’re making a meme or a quick tutorial, a colored rectangle behind your new text is legible and fast.
But if you’re doing profesional work. like a thumbnail for a high-stakes video or a Facebook ad (you need to actually remove the text). Riley Santos, our creative storyteller here, usually says that “immersion is everything.” If a viewer sees a sloppy box covering up old text, it breaks the immersion.
Pro Tip:
Pro Tip: If the background is too messy to clean up perfectly, try blurring the background slightly after removing the text. This hides any imperfections in the generative fill and makes your new text pop even more.
So, masking is faster, but removing & replacing is proffesional. It depends on what you’re going for. But with tools like Gemini and Claude getting better at understanding image context, and PhotoRoom making the erasure instant, there’s really no excuse for sloppy edits anymore.
I mean, look at the stats. 78% of organizations are using AI now, with 70% expecting AI to accelerate content generation including visual editing tasks like text removal. If you’re still doing this the manual way, you’re bringing a knife to a gunfight. Also, PhotoRoom’s sucess story proves the demand. they reached 21.6 million monthly visitors with 4,900% 5-year search growth for automated text, you know, and object removal capabilities.
(…at least.)
Let’s wrap this up. Removing text from images used to be a skill that took years to master. Now, it’s a button click. But the art is in how you replace it, matching the fonts, the lighting, and the vibe. That’s what separates the pros from the amateurs. Give these tools a shot, play around with the settings, and you’ll see just how much cleaner your content looks.
Frequently Asked Questions
What are the most accurate OCR tools for removing text from images?
Microsoft Azure Document Intelligence and AWS Textract are currently the leaders, achieving between 96% and 99.3% accuracy on printed text.
How do AI photo editing tools like PhotoRoom compare to traditional methods?
AI tools like PhotoRoom automate the process using generative fill, which is significantly faster and often cleaner than manual cloning, especially for batch processing.
What are the key features of Magic Eraser and how does it work?
Canva’s Magic Eraser uses AI to identify pixels within a brushed area and replaces them with generated textures based on the surrounding background context.
Can you provide examples of succesful case studies using AI for image editing?
One e-commerce retailer slashed their editing time by 91.3% using AI APIs, while a YouTube creator increased their click-through rate by 30.2% by optimizing thumbnails with text removal tools.
Word Count: 1,847 words
Related Videos


Related Content
• text
For more on this topic, check out: images